redis安裝及簡單應用-創(chuàng)新互聯(lián)
1.系統(tǒng)環(huán)境:centos7.2 —— x86_64

[root@salt1 ~]#cat /etc/centos-release
CentOS Linux release 7.2.1511 (Core)
[root@salt1 ~]#uname -a
Linux salt1 3.10.0-327.el7.x86_64 #1 SMP Thu Nov 19 22:10:57 UTC 2015 x86_64 x86_64 x86_64 GNU/Linux
2.安裝redis
先決條件:首先安裝epel-release(epel源)
[root@salt1 ~]#yum -y install epel-release
然后安裝redis
[root@salt1 ~]#yum -y install redis
[root@salt1 ~]#rpm -q redis
redis-2.8.19-2.el7.x86_64
[root@salt1 ~]#redis-
redis-benchmark redis-check-aof redis-check-dump redis-cli redis-sentinel redis-server redis-shutdown
redis-server:redis服務器的daemon啟動程序
redis-cli: redis命令行客戶端操作工具,當讓也可以用telnet根據(jù)其純文本協(xié)議來操作;
redis-benchmark:redis性能測試工具,測試redis在你的系統(tǒng)及你的配置下的讀寫性能;
redis-check-aof:對于更新日志appendonly.conf檢查,是否可用,類似檢查mysql binlog的工具;
redis-check-dump:用于本地數(shù)據(jù)庫rdb文件的檢查;
3.啟動redis服務
先備份一下redis的配置文件(個人習慣,先備份再操作)
[root@salt1 ~]#cp /etc/redis.conf{,.bak}
redis啟動時最好指定其配置文件,因為redis幾乎所有的控制都在其配置文件;
redis-server : redis服務器的daemon啟動程序
/etc/redis.conf : redis的配置文件
& : 后臺啟動
[root@salt1 ~]#redis-server /etc/redis.conf &
[1] 9462
[root@salt1 ~]#ps -ef | grep redis
root 9462 2767 0 03:59 pts/0 00:00:00 redis-server 127.0.0.1:6379
root 9466 2767 0 03:59 pts/0 00:00:00 grep --color=auto redis
然后再看下日志
[root@salt1 ~]#tail -30 /var/log/redis/redis.log
[9462] 11 Aug 03:59:54.037 * Increased maximum number of open files to 10032 (it was originally set to 1024).
_._
_.-``__ ''-._
_.-`` `. `_. ''-._ Redis 2.8.19 (00000000/0)64 bit
.-`` .-```. ```\/ _.,_ ''-._
( ' , .-` | `, ) Running in stand alone mode
|`-._`-...-` __...-.``-._|'` _.-'| Port:6379
| `-._ `._ / _.-' | PID: 9462
`-._ `-._ `-./ _.-' _.-'
|`-._`-._ `-.__.-' _.-'_.-'|
| `-._`-._ _.-'_.-' | http://redis.io
`-._ `-._`-.__.-'_.-' _.-'
|`-._`-._ `-.__.-' _.-'_.-'|
| `-._`-._ _.-'_.-' |
`-._ `-._`-.__.-'_.-' _.-'
`-._ `-.__.-' _.-'
`-._ _.-'
`-.__.-'
[9462] 11 Aug 03:59:54.038 # Server started, Redis version 2.8.19
[9462] 11 Aug 03:59:54.039 # WARNING overcommit_memory is set to 0!Background save may fail under low memory condition. To fix this issueadd 'vm.overcommit_memory = 1' to /etc/sysctl.conf and then reboot or run the command 'sysctl vm.overcommit_memory=1' for this to take effect.
[9462] 11 Aug 03:59:54.039 # WARNINGyou have Transparent Huge Pages (THP) support enabled in your kernel. This will create latency and memory usage issues with Redis. To fix this issue run the command 'echo never > /sys/kernel/mm/transparent_hugepage/enabled' as root, and add it to your/etc/rc.local in order to retain the setting after a reboot. Redis must be restarted after THP is disabled.
[9462] 11 Aug 03:59:54.040 # WARNING:The TCP backlog setting of 511 cannot be enforced because/proc/sys/net/core/somaxconn is set to the lower value of 128.
[9462] 11 Aug 03:59:54.040 * The server is now ready to accept connections on port 6379
×××字體為:問題
紅色字體為:解決辦法
×××字體解釋:
1.后臺保存在低內存下可能會失敗
vm.overcommit_memory 參數(shù)
默認值為0
0:當用戶空間請求更多的內存時,內核嘗試估算出剩余可用的內存;
1:內核允許超量使用內存,直到用完為止;主要用于科學計算;
2:內核會使用一個絕不過量使用內存的算法,即系統(tǒng)整個內存地址空間不能超過swap+50%的ram值,50%參數(shù)的設定是在overcommit_ratio中設定;
2.啟用了THP(頁面內存透明化)在你的內核具體解釋看 后邊的網(wǎng)址,里頭解釋的更詳細http://os.51cto.com/art/201103/249821.htm
3.tcp backlog 設置為511 不能執(zhí)行,原因是/proc/sys/net/core/somaxconn的值較低
backlog 是網(wǎng)絡連接過程中,某種狀態(tài)的隊列長度,如果并發(fā)高,那么會導致backlog的隊列被占滿,服務器就會丟掉傳進來的其他連接,然后就會出現(xiàn)客戶點連接失敗的情形;
http://jingyan.baidu.com/article/84b4f565e60f8560f6da3227.html
所以底下就開始執(zhí)行對應的操作
注意:藍色字體為需要注意的地方
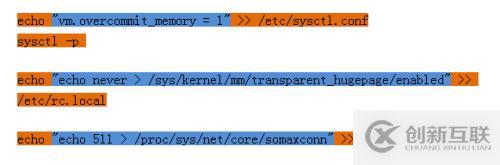
echo "vm.overcommit_memory = 1" >> /etc/sysctl.conf sysctl -p echo "echo never > /sys/kernel/mm/transparent_hugepage/enabled" >> /etc/rc.local echo "echo 511 > /proc/sys/net/core/somaxconn" >> /etc/rc.local下面是一個截圖,需要對比的伙伴可以對一下
相信經過上面3行的配置,你的redis不會再報類似的警告了,當然你還需要在redis.conf文件中指定redis允許使用的內存大小(下章介紹),否則你的服務器撐不了兩天
4.關閉redis服務
1)redis-shutdown #默認會保存后關閉
2)redis-cli shutdown save #
5.連接redis
[root@salt1 ~]#redis-cli
127.0.0.1:6379>
6.簡單操作
127.0.0.1:6379> set id 001 #創(chuàng)建key-vlaue
OK
127.0.0.1:6379>get id #查找key
"001"
127.0.0.1:6379> del id #刪除key
(integer) 1
127.0.0.1:6379> get id
(nil)
127.0.0.1:6379> exists id #查詢id是否存在
(integer) 1
127.0.0.1:6379> del id
(integer) 1
127.0.0.1:6379> exists id
(integer) 0
127.0.0.1:6379> keys * #獲取所有key
127.0.0.1:6379> set k1 v1
OK
127.0.0.1:6379> set k2 v2
OK
127.0.0.1:6379> set k3 v3
OK
127.0.0.1:6379> keys * #獲取所有key
1) "k2"
2) "k3"
3) "k1"
127.0.0.1:6379> dbsize #獲取所有key-value數(shù)
(integer) 3
redis默認有16個庫,但是無法查看到(庫的多少可以在redis.conf中配置)
127.0.0.1:6379> select 1 #切換到第二個庫(從0開始數(shù))
OK
127.0.0.1:6379[1]>keys *
(empty list or set)
127.0.0.1:6379[1]> set name 123
OK
127.0.0.1:6379[1]> keys *
1) "name"
127.0.0.1:6379[1]>select 0
OK
127.0.0.1:6379> keys *
1) "k2"
2) "k3"
3) "k1"
127.0.0.1:6379> select 15
OK
127.0.0.1:6379> select 16
(error) ERR invalid DB index
好了redis的安裝就先說到這兒了
另外有需要云服務器可以了解下創(chuàng)新互聯(lián)cdcxhl.cn,海內外云服務器15元起步,三天無理由+7*72小時售后在線,公司持有idc許可證,提供“云服務器、裸金屬服務器、高防服務器、香港服務器、美國服務器、虛擬主機、免備案服務器”等云主機租用服務以及企業(yè)上云的綜合解決方案,具有“安全穩(wěn)定、簡單易用、服務可用性高、性價比高”等特點與優(yōu)勢,專為企業(yè)上云打造定制,能夠滿足用戶豐富、多元化的應用場景需求。
網(wǎng)站標題:redis安裝及簡單應用-創(chuàng)新互聯(lián)
新聞來源:http://www.chinadenli.net/article44/dpjehe.html
成都網(wǎng)站建設公司_創(chuàng)新互聯(lián),為您提供App開發(fā)、建站公司、品牌網(wǎng)站設計、網(wǎng)站建設、Google、企業(yè)網(wǎng)站制作
聲明:本網(wǎng)站發(fā)布的內容(圖片、視頻和文字)以用戶投稿、用戶轉載內容為主,如果涉及侵權請盡快告知,我們將會在第一時間刪除。文章觀點不代表本網(wǎng)站立場,如需處理請聯(lián)系客服。電話:028-86922220;郵箱:631063699@qq.com。內容未經允許不得轉載,或轉載時需注明來源: 創(chuàng)新互聯(lián)
猜你還喜歡下面的內容
- 如何快速部署SpringPetClinic到函數(shù)計算平臺-創(chuàng)新互聯(lián)
- C#實現(xiàn)中國農歷日歷操作類的代碼分享-創(chuàng)新互聯(lián)
- Python中怎么將多進程寫入同一文件-創(chuàng)新互聯(lián)
- PaddlePaddle-GitHub的正確打開姿勢-創(chuàng)新互聯(lián)
- PyCharm鼠標右鍵不顯示Rununittest的解決方法-創(chuàng)新互聯(lián)
- python的30個操作難點分別是是什么-創(chuàng)新互聯(lián)
- 關于VerticalTabLayout的使用-創(chuàng)新互聯(lián)

- 移動網(wǎng)站建設需要注意的幾個問題 2021-05-02
- 移動網(wǎng)站建設做好這幾點訪客會更喜歡! 2021-08-15
- 如何做好移動網(wǎng)站建設極簡設計 2016-09-30
- 移動網(wǎng)站建設需要注意修補這些漏洞 2021-11-16
- 移動網(wǎng)站建設關于用戶注冊設計的技巧 2021-07-21
- 移動網(wǎng)站建設有哪些需要注意的問題? 2016-08-30
- 你知道移動網(wǎng)站建設如何做嗎? 2021-10-09
- 手機移動網(wǎng)站建設應注意的問題 2016-01-05
- 移動網(wǎng)站建設需要考慮哪些問題? 2022-11-29
- 移動網(wǎng)站建設要考慮哪些要素 2016-10-25
- 移動網(wǎng)站建設的核心內容是什么 2021-09-26
- 移動網(wǎng)站建設如何吸引用戶? 2023-01-30