iOS中如何實(shí)現(xiàn)動態(tài)區(qū)域裁剪圖片功能-創(chuàng)新互聯(lián)
這篇文章主要介紹iOS中如何實(shí)現(xiàn)動態(tài)區(qū)域裁剪圖片功能,文中介紹的非常詳細(xì),具有一定的參考價(jià)值,感興趣的小伙伴們一定要看完!
成都創(chuàng)新互聯(lián)公司專注于聶拉木企業(yè)網(wǎng)站建設(shè),自適應(yīng)網(wǎng)站建設(shè),商城系統(tǒng)網(wǎng)站開發(fā)。聶拉木網(wǎng)站建設(shè)公司,為聶拉木等地區(qū)提供建站服務(wù)。全流程定制網(wǎng)站開發(fā),專業(yè)設(shè)計(jì),全程項(xiàng)目跟蹤,成都創(chuàng)新互聯(lián)公司專業(yè)和態(tài)度為您提供的服務(wù)前言
相信大家應(yīng)該都有所體會,裁剪圖片功能在很多上傳圖片的場景里都需要用到,一方面應(yīng)用服務(wù)器可能對圖片的尺寸大小有限制,因而希望上傳的圖片都是符合規(guī)定的,另一方面,用戶可能希望只上傳圖片中的部分內(nèi)容,突出圖片中關(guān)鍵的信息。而為了滿足用戶多種多樣的裁剪需求,就需要裁剪圖片時(shí)能支持由用戶動態(tài)地改變裁剪范圍、裁剪尺寸等。
動態(tài)裁剪圖片的基本過程大致可以分為以下幾步
顯示圖片與裁剪區(qū)域
支持移動和縮放圖片
支持手勢改變裁剪區(qū)域
進(jìn)行圖片裁剪并獲得裁剪后的圖片
顯示圖片與裁剪區(qū)域
顯示圖片
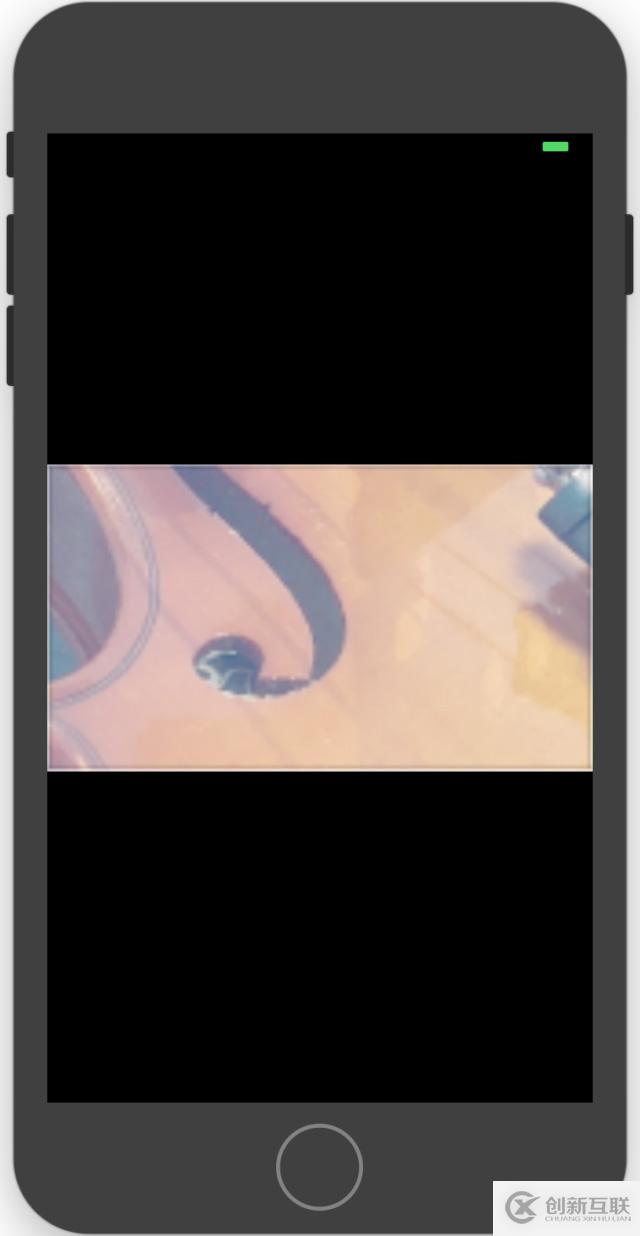
在裁剪圖片之前,首先我們要在頁面上顯示待裁剪的圖片,如下圖所示

這一步比較簡單,配置一個(gè) UIImageView 來放置圖片即可。但是要注意一點(diǎn),UIImageView 有多種 contentMode,最常見有三種
UIViewContentModeScaleToFill
UIViewContentModeScaleAspectFit
UIViewContentModeScaleAspectFill
三者區(qū)別可以看下面的比較
UIViewContentModeScaleToFill

UIViewContentModeScaleAspectFit

UIViewContentModeScaleAspectFill

可以看出,ScaleToFill 會改變圖片的長寬比例來鋪滿整個(gè) UIImageView,ScaleAspectFill 則會保持圖片比例來鋪滿,從而會有部分圖片內(nèi)容超出 UIImageView 區(qū)域的情況,而 ScaleAspectFit 則會保證圖片比例不變,同時(shí)圖片內(nèi)容都顯示在 UIImageView 中,即使無法鋪滿 UIImageView。
因此不同顯示模式會影響到我們最終顯示到屏幕上的圖片的樣子,而在裁剪過程中最理想的放置圖片的模式則是,圖片的短邊剛好鋪滿裁剪區(qū)域的短邊,而長邊至少不會小于裁剪區(qū)域的長邊,這就要求我們要考慮裁剪區(qū)域的長寬來放置我們的圖片。
裁剪區(qū)域
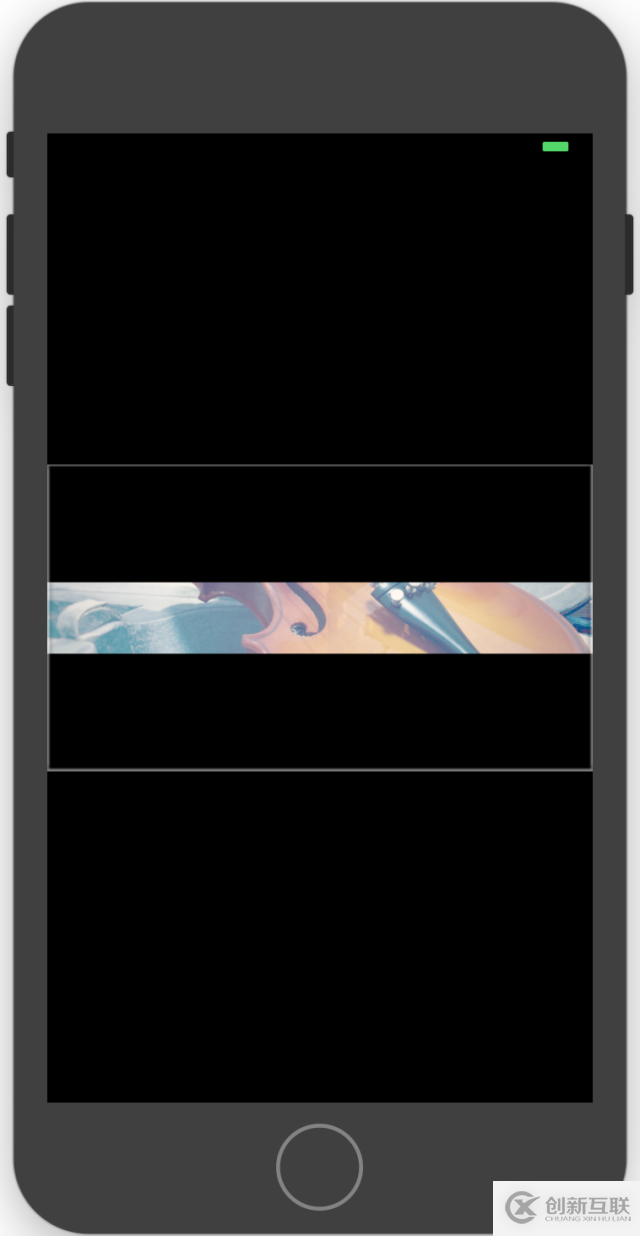
接下來我們要放置我們的裁剪區(qū)域,它的樣子如下所示

裁剪區(qū)域本身就是在 UIImageView 上放上一層 UIView,再在 UIView 上繪制出一個(gè)白邊框的方格 Layer。
首先自定義一個(gè) CAShapeLayer
#import <QuartzCore/QuartzCore.h>

@interface YasicClipAreaLayer : CAShapeLayer

@property(assign, nonatomic) NSInteger cropAreaLeft;
@property(assign, nonatomic) NSInteger cropAreaTop;
@property(assign, nonatomic) NSInteger cropAreaRight;
@property(assign, nonatomic) NSInteger cropAreaBottom;

- (void)setCropAreaLeft:(NSInteger)cropAreaLeft CropAreaTop:(NSInteger)cropAreaTop CropAreaRight:(NSInteger)cropAreaRight CropAreaBottom:(NSInteger)cropAreaBottom;


@end

@implementation YasicClipAreaLayer

- (instancetype)init
{
 self = [super init];
 if (self) {
 _cropAreaLeft = 50;
 _cropAreaTop = 50;
 _cropAreaRight = SCREEN_WIDTH - self.cropAreaLeft;
 _cropAreaBottom = 400;
 }
 return self;
}

- (void)drawInContext:(CGContextRef)ctx
{
 UIGraphicsPushContext(ctx);

 CGContextSetStrokeColorWithColor(ctx, [UIColor whiteColor].CGColor);
 CGContextSetLineWidth(ctx, lineWidth);
 CGContextMoveToPoint(ctx, self.cropAreaLeft, self.cropAreaTop);
 CGContextAddLineToPoint(ctx, self.cropAreaLeft, self.cropAreaBottom);
 CGContextSetShadow(ctx, CGSizeMake(2, 0), 2.0);
 CGContextStrokePath(ctx);

 CGContextSetStrokeColorWithColor(ctx, [UIColor whiteColor].CGColor);
 CGContextSetLineWidth(ctx, lineWidth);
 CGContextMoveToPoint(ctx, self.cropAreaLeft, self.cropAreaTop);
 CGContextAddLineToPoint(ctx, self.cropAreaRight, self.cropAreaTop);
 CGContextSetShadow(ctx, CGSizeMake(0, 2), 2.0);
 CGContextStrokePath(ctx);

 CGContextSetStrokeColorWithColor(ctx, [UIColor whiteColor].CGColor);
 CGContextSetLineWidth(ctx, lineWidth);
 CGContextMoveToPoint(ctx, self.cropAreaRight, self.cropAreaTop);
 CGContextAddLineToPoint(ctx, self.cropAreaRight, self.cropAreaBottom);
 CGContextSetShadow(ctx, CGSizeMake(-2, 0), 2.0);
 CGContextStrokePath(ctx);

 CGContextSetStrokeColorWithColor(ctx, [UIColor whiteColor].CGColor);
 CGContextSetLineWidth(ctx, lineWidth);
 CGContextMoveToPoint(ctx, self.cropAreaLeft, self.cropAreaBottom);
 CGContextAddLineToPoint(ctx, self.cropAreaRight, self.cropAreaBottom);
 CGContextSetShadow(ctx, CGSizeMake(0, -2), 2.0);
 CGContextStrokePath(ctx);

 UIGraphicsPopContext();
}

- (void)setCropAreaLeft:(NSInteger)cropAreaLeft
{
 _cropAreaLeft = cropAreaLeft;
 [self setNeedsDisplay];
}

- (void)setCropAreaTop:(NSInteger)cropAreaTop
{
 _cropAreaTop = cropAreaTop;
 [self setNeedsDisplay];
}

- (void)setCropAreaRight:(NSInteger)cropAreaRight
{
 _cropAreaRight = cropAreaRight;
 [self setNeedsDisplay];
}

- (void)setCropAreaBottom:(NSInteger)cropAreaBottom
{
 _cropAreaBottom = cropAreaBottom;
 [self setNeedsDisplay];
}

- (void)setCropAreaLeft:(NSInteger)cropAreaLeft CropAreaTop:(NSInteger)cropAreaTop CropAreaRight:(NSInteger)cropAreaRight CropAreaBottom:(NSInteger)cropAreaBottom
{
 _cropAreaLeft = cropAreaLeft;
 _cropAreaRight = cropAreaRight;
 _cropAreaTop = cropAreaTop;
 _cropAreaBottom = cropAreaBottom;

 [self setNeedsDisplay];
}

@end
這里 layer 有幾個(gè)屬性 cropAreaLeft、cropAreaRight、cropAreaTop、cropAreaBottom,從命名上可以看出這幾個(gè)屬性定義了這個(gè) layer 上繪制的白邊框裁剪區(qū)域的坐標(biāo)信息。還暴露了一個(gè)方法用于配置這四個(gè)屬性。
然后在 CAShapeLayer 內(nèi)部,重點(diǎn)在于復(fù)寫 drawInContext 方法,這個(gè)方法負(fù)責(zé)直接在圖層上繪圖,復(fù)寫的方法主要做的事情是根據(jù)上面四個(gè)屬性 cropAreaLeft、cropAreaRight、cropAreaTop、cropAreaBottom 繪制出封閉的四條線,這樣就能表示裁剪區(qū)域的邊界了。
要注意的是 drawInContext 方法不能手動顯示調(diào)用,必須通過調(diào)用 setNeedsDisplay 或者 setNeedsDisplayInRect 讓系統(tǒng)自動調(diào)該方法。
在裁剪頁面里,我們放置了一個(gè) cropView,然后將自定義的 CAShaplayer 加入到這個(gè) view 上
 self.cropView.layer.sublayers = nil;
 YasicClipAreaLayer * layer = [[YasicClipAreaLayer alloc] init];

 CGRect cropframe = CGRectMake(self.cropAreaX, self.cropAreaY, self.cropAreaWidth, self.cropAreaHeight);
 UIBezierPath * path = [UIBezierPath bezierPathWithRoundedRect:self.cropView.frame cornerRadius:0];
 UIBezierPath * cropPath = [UIBezierPath bezierPathWithRect:cropframe];
 [path appendPath:cropPath];
 layer.path = path.CGPath;

 layer.fillRule = kCAFillRuleEvenOdd;
 layer.fillColor = [[UIColor blackColor] CGColor];
 layer.opacity = 0.5;

 layer.frame = self.cropView.bounds;
 [layer setCropAreaLeft:self.cropAreaX CropAreaTop:self.cropAreaY CropAreaRight:self.cropAreaX + self.cropAreaWidth CropAreaBottom:self.cropAreaY + self.cropAreaHeight];
 [self.cropView.layer addSublayer:layer];
 [self.view bringSubviewToFront:self.cropView];
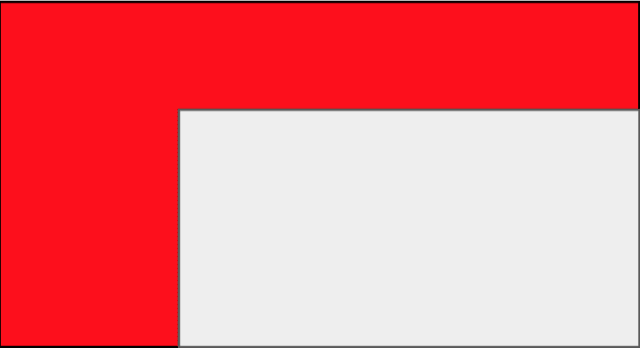
這里主要是為了用自定義的 CAShapelayer 產(chǎn)生出空心遮罩的效果,從而出現(xiàn)中心的裁剪區(qū)域高亮而四周非裁剪區(qū)域有蒙層的效果,示意圖如下
所以首先確定了 cashapelayer 的大小為 cropview 的大小,生成一個(gè)對應(yīng)的 UIBezierPath,然后根據(jù)裁剪區(qū)域的大小(由 self.cropAreaX, self.cropAreaY, self.cropAreaWidth, self.cropAreaHeight 確定)生成空心遮罩的內(nèi)圈 UIBezierPath,
CGRect cropframe = CGRectMake(self.cropAreaX, self.cropAreaY, self.cropAreaWidth, self.cropAreaHeight);
 UIBezierPath * path = [UIBezierPath bezierPathWithRoundedRect:self.cropView.frame cornerRadius:0];
 UIBezierPath * cropPath = [UIBezierPath bezierPathWithRect:cropframe];
 [path appendPath:cropPath];
 layer.path = path.CGPath;
然后將這個(gè) path 配置給 CAShapeLayer,并將 CAShapeLayer 的 fillRule 配置為 kCAFillRuleEvenOdd
 layer.fillRule = kCAFillRuleEvenOdd;
 layer.fillColor = [[UIColor blackColor] CGColor];
 layer.opacity = 0.5;
 layer.frame = self.cropView.bounds;
其中 fillRule 屬性表示使用哪一種算法去判斷畫布上的某區(qū)域是否屬于該圖形“內(nèi)部”,內(nèi)部區(qū)域?qū)⒈惶畛漕伾饕袃煞N方式
kCAFillRuleNonZero,這種算法判斷規(guī)則是,如果從某一點(diǎn)射出任意方向射線,與對應(yīng) Layer 交點(diǎn)為 0 則不在 Layer 內(nèi),大于 0 則在 畫布內(nèi)
kCAFillRuleEvenOdd 如果從某一點(diǎn)射出任意射線,與對應(yīng) Layer 交點(diǎn)為偶數(shù)則在畫布內(nèi),否則不在畫布內(nèi)
再給 CAShapeLayer 設(shè)置蒙層顏色為透明度 0.5 的黑色,就可以實(shí)現(xiàn)空心蒙層效果了。
最后就是設(shè)置 layer 的四個(gè)屬性并繪制內(nèi)邊框的白色邊線。
 [layer setCropAreaLeft:self.cropAreaX CropAreaTop:self.cropAreaY CropAreaRight:self.cropAreaX + self.cropAreaWidth CropAreaBottom:self.cropAreaY + self.cropAreaHeight];
 [self.cropView.layer addSublayer:layer];
 [self.view bringSubviewToFront:self.cropView];
合理放置圖片
到這一步我們正確顯示了圖片,也正確顯示出了裁剪區(qū)域,但是我們沒有將二者的約束關(guān)系建立起來,因此可能會出現(xiàn)下面這樣的情況
可以看到這里由于這張圖片的 width 遠(yuǎn)大于 height,因此會在裁剪區(qū)域內(nèi)出現(xiàn)黑色區(qū)域,這對用戶來說是一種不好的體驗(yàn),同時(shí)也會影響到我們后面的裁剪步驟,究其原因是因?yàn)槲覀儧]有針對裁剪區(qū)域的寬高來放置 UIImageView,我們希望最理想的效果是,能在裁剪區(qū)域內(nèi)實(shí)現(xiàn)類似 UIViewContentModeScaleAspectFill 的效果,也就是圖片保持比例地鋪滿裁剪區(qū)域,并允許部分內(nèi)容超出裁剪區(qū)域,這就要求
當(dāng)圖片寬與裁剪區(qū)域?qū)捴却笥趫D片高與裁剪區(qū)域高之比時(shí),將圖片高鋪滿裁剪區(qū)域高,圖片寬成比例放大
當(dāng)圖片高與裁剪區(qū)域高之比大于圖片寬與裁剪區(qū)域?qū)捴葧r(shí),將圖片寬鋪滿裁剪區(qū)域?qū)挘瑘D片高成比例方法
這里我們用到 Masonry 來做這些布局操作
 CGFloat tempWidth = 0.0;
 CGFloat tempHeight = 0.0;

 if (self.targetImage.size.width/self.cropAreaWidth <= self.targetImage.size.height/self.cropAreaHeight) {
 tempWidth = self.cropAreaWidth;
 tempHeight = (tempWidth/self.targetImage.size.width) * self.targetImage.size.height;
 } else if (self.targetImage.size.width/self.cropAreaWidth > self.targetImage.size.height/self.cropAreaHeight) {
 tempHeight = self.cropAreaHeight;
 tempWidth = (tempHeight/self.targetImage.size.height) * self.targetImage.size.width;
 }

 [self.bigImageView mas_updateConstraints:^(MASConstraintMaker *make) {
 make.left.mas_equalTo(self.cropAreaX - (tempWidth - self.cropAreaWidth)/2);
 make.top.mas_equalTo(self.cropAreaY - (tempHeight - self.cropAreaHeight)/2);
 make.width.mas_equalTo(tempWidth);
 make.height.mas_equalTo(tempHeight);
 }];
可以看到,我們進(jìn)行了兩步判斷,從而獲得合適的寬高值,然后將圖片進(jìn)行布局,在自動布局時(shí)將圖片中心與裁剪區(qū)域中心重合,最后我們會得到下面的效果圖
支持移動和縮放圖片
正如上面所講,由于圖片在裁剪區(qū)域內(nèi)是以類似 UIViewContentModeScaleAspectFill 的方式放置的,很可能出現(xiàn)部分內(nèi)容溢出裁剪區(qū)域,因此我們要讓圖片能支持動態(tài)移動和縮放,從而使用戶能靈活地裁剪圖片的內(nèi)容。
具體實(shí)現(xiàn)上,我們其實(shí)是在 cropview 上加上手勢,間接操作圖片的尺寸和位置,這樣有助于后面我們實(shí)現(xiàn)動態(tài)改變裁剪區(qū)域的實(shí)現(xiàn)。
縮放功能
這里實(shí)現(xiàn)縮放的原理實(shí)際是對放置圖片的 UIImageView 的 frame 進(jìn)行修改,首先我們要記錄下最初的 UIImageView 的 frame
self.originalFrame = CGRectMake(self.cropAreaX - (tempWidth - self.cropAreaWidth)/2, self.cropAreaY - (tempHeight - self.cropAreaHeight)/2, tempWidth, tempHeight);
然后為 cropView 添加手勢
 // 捏合手勢
 UIPinchGestureRecognizer *pinGesture = [[UIPinchGestureRecognizer alloc] initWithTarget:self action:@selector(handleCenterPinGesture:)];
 [self.view addGestureRecognizer:pinGesture];
然后是手勢處理函數(shù)
-(void)handleCenterPinGesture:(UIPinchGestureRecognizer *)pinGesture
{
 CGFloat scaleRation = 3;
 UIView * view = self.bigImageView;

 // 縮放開始與縮放中
 if (pinGesture.state == UIGestureRecognizerStateBegan || pinGesture.state == UIGestureRecognizerStateChanged) {
 // 移動縮放中心到手指中心
 CGPoint pinchCenter = [pinGesture locationInView:view.superview];
 CGFloat distanceX = view.frame.origin.x - pinchCenter.x;
 CGFloat distanceY = view.frame.origin.y - pinchCenter.y;
 CGFloat scaledDistanceX = distanceX * pinGesture.scale;
 CGFloat scaledDistanceY = distanceY * pinGesture.scale;
 CGRect newFrame = CGRectMake(view.frame.origin.x + scaledDistanceX - distanceX, view.frame.origin.y + scaledDistanceY - distanceY, view.frame.size.width * pinGesture.scale, view.frame.size.height * pinGesture.scale);
 view.frame = newFrame;
 pinGesture.scale = 1;
 }

 // 縮放結(jié)束
 if (pinGesture.state == UIGestureRecognizerStateEnded) {
 CGFloat ration = view.frame.size.width / self.originalFrame.size.width;

 // 縮放過大
 if (ration > 5) {
 CGRect newFrame = CGRectMake(0, 0, self.originalFrame.size.width * scaleRation, self.originalFrame.size.height * scaleRation);
 view.frame = newFrame;
 }

 // 縮放過小
 if (ration < 0.25) {
 view.frame = self.originalFrame;
 }
 // 對圖片進(jìn)行位置修正
 CGRect resetPosition = CGRectMake(view.frame.origin.x, view.frame.origin.y, view.frame.size.width, view.frame.size.height);

 if (resetPosition.origin.x >= self.cropAreaX) {
 resetPosition.origin.x = self.cropAreaX;
 }
 if (resetPosition.origin.y >= self.cropAreaY) {
 resetPosition.origin.y = self.cropAreaY;
 }
 if (resetPosition.size.width + resetPosition.origin.x < self.cropAreaX + self.cropAreaWidth) {
 CGFloat movedLeftX = fabs(resetPosition.size.width + resetPosition.origin.x - (self.cropAreaX + self.cropAreaWidth));
 resetPosition.origin.x += movedLeftX;
 }
 if (resetPosition.size.height + resetPosition.origin.y < self.cropAreaY + self.cropAreaHeight) {
 CGFloat moveUpY = fabs(resetPosition.size.height + resetPosition.origin.y - (self.cropAreaY + self.cropAreaHeight));
 resetPosition.origin.y += moveUpY;
 }
 view.frame = resetPosition;

 // 對圖片縮放進(jìn)行比例修正,防止過小
 if (self.cropAreaX < self.bigImageView.frame.origin.x
 || ((self.cropAreaX + self.cropAreaWidth) > self.bigImageView.frame.origin.x + self.bigImageView.frame.size.width)
 || self.cropAreaY < self.bigImageView.frame.origin.y
 || ((self.cropAreaY + self.cropAreaHeight) > self.bigImageView.frame.origin.y + self.bigImageView.frame.size.height)) {
 view.frame = self.originalFrame;
 }
 }
}
在手勢處理時(shí),要注意,為了能跟隨用戶捏合手勢的中心進(jìn)行縮放,我們要在手勢過程中移動縮放中心到手指中心,這里我們判斷了 pinGesture 的 state 來確定手勢開始、進(jìn)行中和結(jié)束階段。
 if (pinGesture.state == UIGestureRecognizerStateBegan || pinGesture.state == UIGestureRecognizerStateChanged) {
 // 移動縮放中心到手指中心
 CGPoint pinchCenter = [pinGesture locationInView:view.superview];
 CGFloat distanceX = view.frame.origin.x - pinchCenter.x;
 CGFloat distanceY = view.frame.origin.y - pinchCenter.y;
 CGFloat scaledDistanceX = distanceX * pinGesture.scale;
 CGFloat scaledDistanceY = distanceY * pinGesture.scale;
 CGRect newFrame = CGRectMake(view.frame.origin.x + scaledDistanceX - distanceX, view.frame.origin.y + scaledDistanceY - distanceY, view.frame.size.width * pinGesture.scale, view.frame.size.height * pinGesture.scale);
 view.frame = newFrame;
 pinGesture.scale = 1;
 }
pinchCenter 就是捏合手勢的中心,我們獲取到當(dāng)前圖片 view 的 frame,然后計(jì)算當(dāng)前 view 與手勢中心的 x、y 坐標(biāo)差,再根據(jù)手勢縮放值 scale,創(chuàng)建出新的 frame
CGRect newFrame = CGRectMake(view.frame.origin.x + scaledDistanceX - distanceX, view.frame.origin.y + scaledDistanceY - distanceY, view.frame.size.width * pinGesture.scale, view.frame.size.height * pinGesture.scale);
這個(gè) frame 的中心坐標(biāo)就在縮放手勢的中心,將新的 frame 賦值給圖片 view,從而實(shí)現(xiàn)依據(jù)手勢中心進(jìn)行縮放的效果。
而在手勢結(jié)束階段,我們要對圖片縮放進(jìn)行邊界保護(hù),既不能放大過大,也不能縮小過小。
CGFloat ration = view.frame.size.width / self.originalFrame.size.width;

 // 縮放過大
 if (ration > 5) {
 CGRect newFrame = CGRectMake(0, 0, self.originalFrame.size.width * scaleRation, self.originalFrame.size.height * scaleRation);
 view.frame = newFrame;
 }

 // 縮放過小
 if (ration < 0.25) {
 view.frame = self.originalFrame;
 }
同時(shí)縮放后如果圖片與裁剪區(qū)域出現(xiàn)了空白區(qū)域,還要對圖片的位置進(jìn)行修正以保證圖片始終是覆蓋全裁剪區(qū)域的。
// 對圖片進(jìn)行位置修正
 CGRect resetPosition = CGRectMake(view.frame.origin.x, view.frame.origin.y, view.frame.size.width, view.frame.size.height);

 if (resetPosition.origin.x >= self.cropAreaX) {
  resetPosition.origin.x = self.cropAreaX;
 }
 if (resetPosition.origin.y >= self.cropAreaY) {
  resetPosition.origin.y = self.cropAreaY;
 }
 if (resetPosition.size.width + resetPosition.origin.x < self.cropAreaX + self.cropAreaWidth) {
  CGFloat movedLeftX = fabs(resetPosition.size.width + resetPosition.origin.x - (self.cropAreaX + self.cropAreaWidth));
  resetPosition.origin.x += movedLeftX;
 }
 if (resetPosition.size.height + resetPosition.origin.y < self.cropAreaY + self.cropAreaHeight) {
  CGFloat moveUpY = fabs(resetPosition.size.height + resetPosition.origin.y - (self.cropAreaY + self.cropAreaHeight));
  resetPosition.origin.y += moveUpY;
 }
 view.frame = resetPosition;
這里我們通過生成當(dāng)前圖片的 CGRect,與裁剪區(qū)域的邊界進(jìn)行如下比較
圖片左邊線大于裁剪區(qū)域左邊線時(shí)圖片移動到裁剪區(qū)域 x 值
圖片上邊線大于裁剪區(qū)域上邊線時(shí)圖片移動到裁剪區(qū)域 y 值
圖片右邊線小于裁剪區(qū)域右邊線時(shí)圖片右貼裁剪區(qū)域右邊線
圖片下邊線小于裁剪區(qū)域右邊線時(shí)圖片下貼裁剪區(qū)域下邊線
進(jìn)行這番操作后,可能會出現(xiàn)由于圖片過小無法鋪滿裁剪區(qū)域的情況,如下圖所示
因此還需要再次對圖片尺寸進(jìn)行修正
 // 對圖片縮放進(jìn)行比例修正,防止過小
 if (self.cropAreaX < self.bigImageView.frame.origin.x
  || ((self.cropAreaX + self.cropAreaWidth) > self.bigImageView.frame.origin.x + self.bigImageView.frame.size.width)
  || self.cropAreaY < self.bigImageView.frame.origin.y
  || ((self.cropAreaY + self.cropAreaHeight) > self.bigImageView.frame.origin.y + self.bigImageView.frame.size.height)) {
  view.frame = self.originalFrame;
 }
這樣就實(shí)現(xiàn)了縮放功能。
移動功能
相比于縮放,移動功能實(shí)現(xiàn)就簡單了,只需要在 cropview 上添加 UIPanGestureRecognizer,然后在回調(diào)方法里拿到需要移動的距離,修改 UIImageView 的 center 就可以了。
 CGPoint translation = [panGesture translationInView:view.superview];
 [view setCenter:CGPointMake(view.center.x + translation.x, view.center.y + translation.y)];
  [panGesture setTranslation:CGPointZero inView:view.superview];
但是同樣為了保證移動后的圖片不會與裁剪區(qū)域出現(xiàn)空白甚至是超出裁剪區(qū)域,這里更新了圖片位置后,在手勢結(jié)束時(shí)還要對圖片進(jìn)行位置修正
  CGRect currentFrame = view.frame;

  if (currentFrame.origin.x >= self.cropAreaX) {
   currentFrame.origin.x = self.cropAreaX;

  }
  if (currentFrame.origin.y >= self.cropAreaY) {
   currentFrame.origin.y = self.cropAreaY;
  }
  if (currentFrame.size.width + currentFrame.origin.x < self.cropAreaX + self.cropAreaWidth) {
   CGFloat movedLeftX = fabs(currentFrame.size.width + currentFrame.origin.x - (self.cropAreaX + self.cropAreaWidth));
   currentFrame.origin.x += movedLeftX;
  }
  if (currentFrame.size.height + currentFrame.origin.y < self.cropAreaY + self.cropAreaHeight) {
   CGFloat moveUpY = fabs(currentFrame.size.height + currentFrame.origin.y - (self.cropAreaY + self.cropAreaHeight));
   currentFrame.origin.y += moveUpY;
  }
  [UIView animateWithDuration:0.3 animations:^{

   [view setFrame:currentFrame];
  }];
可以看到,這里做的位置檢查與縮放時(shí)做的檢查是一樣的,只是由于不會改變圖片尺寸所以這里不需要進(jìn)行尺寸修正。
支持手勢改變裁剪區(qū)域
接下來就是動態(tài)裁剪圖片的核心內(nèi)容了,其實(shí)原理也很簡單,只要在上面的移動手勢處理函數(shù)中,進(jìn)行一些判斷,決定是移動圖片位置還是改變裁剪區(qū)域,也就是自定義的 CAShapeLayer 的繪制方框的尺寸就可以了。
首先我們定義一個(gè)枚舉,用來表示當(dāng)前應(yīng)當(dāng)操作的是圖片還是裁剪區(qū)域的邊線
typedef NS_ENUM(NSInteger, ACTIVEGESTUREVIEW) {
 CROPVIEWLEFT,
 CROPVIEWRIGHT,
 CROPVIEWTOP,
 CROPVIEWBOTTOM,
 BIGIMAGEVIEW
};
它們分別表示觸發(fā)對象為裁剪區(qū)域左邊線、右邊線、上邊線、下邊線以及 UIImageView
然后我們定義一個(gè)枚舉屬性
@property(assign, nonatomic) ACTIVEGESTUREVIEW activeGestureView;
判斷操作對象的標(biāo)準(zhǔn)是當(dāng)前的手勢所觸發(fā)的位置是在邊線上還是在非邊線上,因此我們需要知道手勢觸發(fā)時(shí)的坐標(biāo),要知道這一點(diǎn)就需要我們繼承一個(gè) UIPanGestureRecognizer 并覆寫一些方法
@interface YasicPanGestureRecognizer : UIPanGestureRecognizer

@property(assign, nonatomic) CGPoint beginPoint;
@property(assign, nonatomic) CGPoint movePoint;

-(instancetype)initWithTarget:(id)target action:(SEL)action inview:(UIView*)view;

@end

@interface YasicPanGestureRecognizer()

@property(strong, nonatomic) UIView *targetView;

@end

@implementation YasicPanGestureRecognizer

-(instancetype)initWithTarget:(id)target action:(SEL)action inview:(UIView*)view{

 self = [super initWithTarget:target action:action];
 if(self) {
 self.targetView = view;
 }
 return self;
}

- (void)touchesBegan:(NSSet *)touches withEvent:(UIEvent*)event{

 [super touchesBegan:touches withEvent:event];
 UITouch *touch = [touches anyObject];
 self.beginPoint = [touch locationInView:self.targetView];
}

- (void)touchesMoved:(NSSet<UITouch *> *)touches withEvent:(UIEvent *)event
{
 [super touchesMoved:touches withEvent:event];
 UITouch *touch = [touches anyObject];
 self.movePoint = [touch locationInView:self.targetView];
}

@end
可以看到,我們首先傳入了一個(gè) view,用于將手勢觸發(fā)的位置轉(zhuǎn)換為 view 中的坐標(biāo)值。在 - (void)touchesBegan:(NSSet *)touches withEvent:(UIEvent*)event{ 方法中我們得到了手勢開始時(shí)的觸發(fā)點(diǎn) beginPoint,在 - (void)touchesMoved:(NSSet<UITouch *> *)touches withEvent:(UIEvent *)event 方法中我們獲得了手勢進(jìn)行時(shí)的觸發(fā)點(diǎn) movePoint。
自定義完 UIPanGestureRecognizer 后我們將其加到 cropview 上并把 cropview 作為參數(shù)傳給 UIPanGestureRecognizer
 // 拖動手勢
 YasicPanGestureRecognizer *panGesture = [[YasicPanGestureRecognizer alloc] initWithTarget:self action:@selector(handleDynamicPanGesture:) inview:self.cropView];
 [self.cropView addGestureRecognizer:panGesture];
接下來就是處理手勢的函數(shù),這里我們可以將整個(gè)過程分為三個(gè)步驟,開始時(shí) -> 進(jìn)行時(shí) -> 結(jié)束時(shí)。
手勢開始時(shí)
在這里我們要根據(jù)手勢的 beginPoint 判斷觸發(fā)對象是邊線還是 UIImageView
// 開始滑動時(shí)判斷滑動對象是 ImageView 還是 Layer 上的 Line
 if (panGesture.state == UIGestureRecognizerStateBegan) {
 if (beginPoint.x >= self.cropAreaX - judgeWidth && beginPoint.x <= self.cropAreaX + judgeWidth && beginPoint.y >= self.cropAreaY && beginPoint.y <= self.cropAreaY + self.cropAreaHeight && self.cropAreaWidth >= 50) {
  self.activeGestureView = CROPVIEWLEFT;
 } else if (beginPoint.x >= self.cropAreaX + self.cropAreaWidth - judgeWidth && beginPoint.x <= self.cropAreaX + self.cropAreaWidth + judgeWidth && beginPoint.y >= self.cropAreaY && beginPoint.y <= self.cropAreaY + self.cropAreaHeight && self.cropAreaWidth >= 50) {
  self.activeGestureView = CROPVIEWRIGHT;
 } else if (beginPoint.y >= self.cropAreaY - judgeWidth && beginPoint.y <= self.cropAreaY + judgeWidth && beginPoint.x >= self.cropAreaX && beginPoint.x <= self.cropAreaX + self.cropAreaWidth && self.cropAreaHeight >= 50) {
  self.activeGestureView = CROPVIEWTOP;
 } else if (beginPoint.y >= self.cropAreaY + self.cropAreaHeight - judgeWidth && beginPoint.y <= self.cropAreaY + self.cropAreaHeight + judgeWidth && beginPoint.x >= self.cropAreaX && beginPoint.x <= self.cropAreaX + self.cropAreaWidth && self.cropAreaHeight >= 50) {
  self.activeGestureView = CROPVIEWBOTTOM;
 } else {
  self.activeGestureView = BIGIMAGEVIEW;
  [view setCenter:CGPointMake(view.center.x + translation.x, view.center.y + translation.y)];
  [panGesture setTranslation:CGPointZero inView:view.superview];
 }
 }
手勢進(jìn)行時(shí)
在這里,如果觸發(fā)對象是邊線,則計(jì)算邊線需要移動的距離和方向,以及對于邊界條件的限制以防止邊線之間交叉錯(cuò)位的情況,具體來說就是獲得坐標(biāo)差值,更新 cropAreaX、cropAreaWidth 等值,然后更新 CAShapeLayer 上的空心蒙層。
如果觸發(fā)對象是 UIImageView 則只需要將其位置進(jìn)行改變即可。
// 滑動過程中進(jìn)行位置改變
 if (panGesture.state == UIGestureRecognizerStateChanged) {
 CGFloat diff = 0;
 switch (self.activeGestureView) {
  case CROPVIEWLEFT: {
  diff = movePoint.x - self.cropAreaX;
  if (diff >= 0 && self.cropAreaWidth > 50) {
   self.cropAreaWidth -= diff;
   self.cropAreaX += diff;
  } else if (diff < 0 && self.cropAreaX > self.bigImageView.frame.origin.x && self.cropAreaX >= 15) {
   self.cropAreaWidth -= diff;
   self.cropAreaX += diff;
  }
  [self setUpCropLayer];
  break;
  }
  case CROPVIEWRIGHT: {
  diff = movePoint.x - self.cropAreaX - self.cropAreaWidth;
  if (diff >= 0 && (self.cropAreaX + self.cropAreaWidth) < MIN(self.bigImageView.frame.origin.x + self.bigImageView.frame.size.width, self.cropView.frame.origin.x + self.cropView.frame.size.width - 15)){
   self.cropAreaWidth += diff;
  } else if (diff < 0 && self.cropAreaWidth >= 50) {
   self.cropAreaWidth += diff;
  }
  [self setUpCropLayer];
  break;
  }
  case CROPVIEWTOP: {
  diff = movePoint.y - self.cropAreaY;
  if (diff >= 0 && self.cropAreaHeight > 50) {
   self.cropAreaHeight -= diff;
   self.cropAreaY += diff;
  } else if (diff < 0 && self.cropAreaY > self.bigImageView.frame.origin.y && self.cropAreaY >= 15) {
   self.cropAreaHeight -= diff;
   self.cropAreaY += diff;
  }
  [self setUpCropLayer];
  break;
  }
  case CROPVIEWBOTTOM: {
  diff = movePoint.y - self.cropAreaY - self.cropAreaHeight;
  if (diff >= 0 && (self.cropAreaY + self.cropAreaHeight) < MIN(self.bigImageView.frame.origin.y + self.bigImageView.frame.size.height, self.cropView.frame.origin.y + self.cropView.frame.size.height - 15)){
   self.cropAreaHeight += diff;
  } else if (diff < 0 && self.cropAreaHeight >= 50) {
   self.cropAreaHeight += diff;
  }
  [self setUpCropLayer];
  break;
  }
  case BIGIMAGEVIEW: {
  [view setCenter:CGPointMake(view.center.x + translation.x, view.center.y + translation.y)];
  [panGesture setTranslation:CGPointZero inView:view.superview];
  break;
  }
  default:
  break;
 }
 }
手勢結(jié)束時(shí)
手勢結(jié)束時(shí),我們需要對位置進(jìn)行修正。如果是裁剪區(qū)域邊線,則要判斷左右、上下邊線之間的距離是否過短,邊線是否超出 UIImageView 的范圍等。如果左右邊線距離過短則設(shè)置最小裁剪寬度,如果上線邊線距離過短則設(shè)置最小裁剪高度,如果左邊線超出了 UIImageView 左邊線則需要緊貼 UIImageView 的左邊線,并更新裁剪區(qū)域?qū)挾龋源祟愅啤H缓蟾?CAShapeLayer 上的空心蒙層即可。
如果是 UIImageView 則跟上一節(jié)一樣要保證圖片不會與裁剪區(qū)域出現(xiàn)空白。
 // 滑動結(jié)束后進(jìn)行位置修正
 if (panGesture.state == UIGestureRecognizerStateEnded) {
 switch (self.activeGestureView) {
  case CROPVIEWLEFT: {
  if (self.cropAreaWidth < 50) {
   self.cropAreaX -= 50 - self.cropAreaWidth;
   self.cropAreaWidth = 50;
  }
  if (self.cropAreaX < MAX(self.bigImageView.frame.origin.x, 15)) {
   CGFloat temp = self.cropAreaX + self.cropAreaWidth;
   self.cropAreaX = MAX(self.bigImageView.frame.origin.x, 15);
   self.cropAreaWidth = temp - self.cropAreaX;
  }
  [self setUpCropLayer];
  break;
  }
  case CROPVIEWRIGHT: {
  if (self.cropAreaWidth < 50) {
   self.cropAreaWidth = 50;
  }
  if (self.cropAreaX + self.cropAreaWidth > MIN(self.bigImageView.frame.origin.x + self.bigImageView.frame.size.width, self.cropView.frame.origin.x + self.cropView.frame.size.width - 15)) {
   self.cropAreaWidth = MIN(self.bigImageView.frame.origin.x + self.bigImageView.frame.size.width, self.cropView.frame.origin.x + self.cropView.frame.size.width - 15) - self.cropAreaX;
  }
  [self setUpCropLayer];
  break;
  }
  case CROPVIEWTOP: {
  if (self.cropAreaHeight < 50) {
   self.cropAreaY -= 50 - self.cropAreaHeight;
   self.cropAreaHeight = 50;
  }
  if (self.cropAreaY < MAX(self.bigImageView.frame.origin.y, 15)) {
   CGFloat temp = self.cropAreaY + self.cropAreaHeight;
   self.cropAreaY = MAX(self.bigImageView.frame.origin.y, 15);
   self.cropAreaHeight = temp - self.cropAreaY;
  }
  [self setUpCropLayer];
  break;
  }
  case CROPVIEWBOTTOM: {
  if (self.cropAreaHeight < 50) {
   self.cropAreaHeight = 50;
  }
  if (self.cropAreaY + self.cropAreaHeight > MIN(self.bigImageView.frame.origin.y + self.bigImageView.frame.size.height, self.cropView.frame.origin.y + self.cropView.frame.size.height - 15)) {
   self.cropAreaHeight = MIN(self.bigImageView.frame.origin.y + self.bigImageView.frame.size.height, self.cropView.frame.origin.y + self.cropView.frame.size.height - 15) - self.cropAreaY;
  }
  [self setUpCropLayer];
  break;
  }
  case BIGIMAGEVIEW: {
  CGRect currentFrame = view.frame;

  if (currentFrame.origin.x >= self.cropAreaX) {
   currentFrame.origin.x = self.cropAreaX;

  }
  if (currentFrame.origin.y >= self.cropAreaY) {
   currentFrame.origin.y = self.cropAreaY;
  }
  if (currentFrame.size.width + currentFrame.origin.x < self.cropAreaX + self.cropAreaWidth) {
   CGFloat movedLeftX = fabs(currentFrame.size.width + currentFrame.origin.x - (self.cropAreaX + self.cropAreaWidth));
   currentFrame.origin.x += movedLeftX;
  }
  if (currentFrame.size.height + currentFrame.origin.y < self.cropAreaY + self.cropAreaHeight) {
   CGFloat moveUpY = fabs(currentFrame.size.height + currentFrame.origin.y - (self.cropAreaY + self.cropAreaHeight));
   currentFrame.origin.y += moveUpY;
  }
  [UIView animateWithDuration:0.3 animations:^{

   [view setFrame:currentFrame];
  }];
  break;
  }
  default:
  break;
 }
 }
進(jìn)行圖片裁剪并獲得裁剪后的圖片
最后一步就是對圖片進(jìn)行裁剪了。首先確定對圖片的縮放尺寸 imageScale
CGFloat imageScale = MIN(self.bigImageView.frame.size.width/self.targetImage.size.width, self.bigImageView.frame.size.height/self.targetImage.size.height);
然后將 cropView 的裁剪區(qū)域?qū)?yīng)到 UIImageView 上,再除以縮放值,即可得到對應(yīng) UIImage 上需要裁剪的區(qū)域
 CGFloat cropX = (self.cropAreaX - self.bigImageView.frame.origin.x)/imageScale;
 CGFloat cropY = (self.cropAreaY - self.bigImageView.frame.origin.y)/imageScale;
 CGFloat cropWidth = self.cropAreaWidth/imageScale;
 CGFloat cropHeight = self.cropAreaHeight/imageScale;
 CGRect cropRect = CGRectMake(cropX, cropY, cropWidth, cropHeight);
最后調(diào)用 CoreGraphic 的方法,將圖片對應(yīng)區(qū)域的數(shù)據(jù)取出來生成新的圖片,就是我們需要的裁剪后的圖片了。
 CGImageRef sourceImageRef = [self.targetImage CGImage];
 CGImageRef newImageRef = CGImageCreateWithImageInRect(sourceImageRef, cropRect);
 UIImage *newImage = [UIImage imageWithCGImage:newImageRef];
以上是“iOS中如何實(shí)現(xiàn)動態(tài)區(qū)域裁剪圖片功能”這篇文章的所有內(nèi)容,感謝各位的閱讀!希望分享的內(nèi)容對大家有幫助,更多相關(guān)知識,歡迎關(guān)注創(chuàng)新互聯(lián)網(wǎng)站建設(shè)公司行業(yè)資訊頻道!
另外有需要云服務(wù)器可以了解下創(chuàng)新互聯(lián)建站www.chinadenli.net,海內(nèi)外云服務(wù)器15元起步,三天無理由+7*72小時(shí)售后在線,公司持有idc許可證,提供“云服務(wù)器、裸金屬服務(wù)器、高防服務(wù)器、香港服務(wù)器、美國服務(wù)器、虛擬主機(jī)、免備案服務(wù)器”等云主機(jī)租用服務(wù)以及企業(yè)上云的綜合解決方案,具有“安全穩(wěn)定、簡單易用、服務(wù)可用性高、性價(jià)比高”等特點(diǎn)與優(yōu)勢,專為企業(yè)上云打造定制,能夠滿足用戶豐富、多元化的應(yīng)用場景需求。
標(biāo)題名稱:iOS中如何實(shí)現(xiàn)動態(tài)區(qū)域裁剪圖片功能-創(chuàng)新互聯(lián)
分享地址:http://www.chinadenli.net/article38/dhchsp.html
成都網(wǎng)站建設(shè)公司_創(chuàng)新互聯(lián),為您提供網(wǎng)站建設(shè)、微信公眾號、企業(yè)網(wǎng)站制作、手機(jī)網(wǎng)站建設(shè)、軟件開發(fā)、用戶體驗(yàn)
聲明:本網(wǎng)站發(fā)布的內(nèi)容(圖片、視頻和文字)以用戶投稿、用戶轉(zhuǎn)載內(nèi)容為主,如果涉及侵權(quán)請盡快告知,我們將會在第一時(shí)間刪除。文章觀點(diǎn)不代表本網(wǎng)站立場,如需處理請聯(lián)系客服。電話:028-86922220;郵箱:631063699@qq.com。內(nèi)容未經(jīng)允許不得轉(zhuǎn)載,或轉(zhuǎn)載時(shí)需注明來源: 創(chuàng)新互聯(lián)
猜你還喜歡下面的內(nèi)容
- 訂閱號和公眾號有什么區(qū)別-創(chuàng)新互聯(lián)
- 智能小程序內(nèi)容質(zhì)量怎么優(yōu)化-創(chuàng)新互聯(lián)
- 利用ELK協(xié)助安全性攻擊的數(shù)據(jù)分析-創(chuàng)新互聯(lián)
- unit怎么讀英語module怎么讀?-創(chuàng)新互聯(lián)
- 分享一次服務(wù)器被挖礦的處理方法-創(chuàng)新互聯(lián)
- php是屬于后臺還是前端的開發(fā)語言-創(chuàng)新互聯(lián)
- mfc圖形界面編程實(shí)例怎么用c語言做一個(gè)界面?-創(chuàng)新互聯(lián)

- .vip域名注冊優(yōu)勢在哪 2022-07-11
- 域名注冊需要哪些注意事項(xiàng)? 2016-05-31
- 網(wǎng)站域名注冊-域名注冊應(yīng)該注意哪些事項(xiàng)? 2016-11-09
- 企業(yè)網(wǎng)站建設(shè)中的域名注冊解析及服務(wù)器配置 2021-02-21
- 新頂級域名注冊去哪兒? 2022-07-15
- 2016年網(wǎng)站域名注冊和使用發(fā)生了那些變化 2016-10-29
- 東莞網(wǎng)站制作國際域名注冊要求 2022-06-20
- 互聯(lián)網(wǎng)域名注冊那些事兒 2021-03-07
- Radix注冊局.SITE域名注冊量突破100萬 2021-02-01
- 域名注冊要考慮的四大因素 2022-12-27
- 域名隱私保護(hù)服務(wù) 避免域名注冊信息公示 2022-06-14
- com域名注冊怎么樣?如何選擇com域名 2021-02-22