C#中怎么利用networkcomms3.0實現(xiàn)模擬登陸
本篇文章給大家分享的是有關C# 中怎么利用networkcomms 3.0實現(xiàn)模擬登陸,小編覺得挺實用的,因此分享給大家學習,希望大家閱讀完這篇文章后可以有所收獲,話不多說,跟著小編一起來看看吧。
創(chuàng)新互聯(lián)公司自2013年創(chuàng)立以來,是專業(yè)互聯(lián)網技術服務公司,擁有項目成都網站設計、成都做網站網站策劃,項目實施與項目整合能力。我們以讓每一個夢想脫穎而出為使命,1280元山陽做網站,已為上家服務,為山陽各地企業(yè)和個人服務,聯(lián)系電話:028-86922220
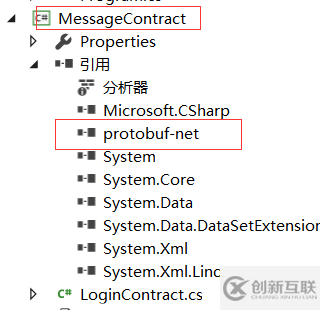
新建服務器端

using MessageContract;
using NetworkCommsDotNet;
using NetworkCommsDotNet.Connections;
using NetworkCommsDotNet.Connections.TCP;
using NetworkCommsDotNet.DPSBase;
using System;
using System.Collections.Generic;
using System.ComponentModel;
using System.Data;
using System.Drawing;
using System.Linq;
using System.Net;
using System.Text;
using System.Windows.Forms;
namespace AppServer
{
public partial class MaiForm : Form
{
public MaiForm()
{
InitializeComponent();
}
SendReceiveOptions aboveOptions = new SendReceiveOptions(DPSManager.GetDataSerializer<ProtobufSerializer>(), null, null);
private void button1_Click(object sender, EventArgs e)
{
//服務器開始監(jiān)聽客戶端的請求
Connection.StartListening(ConnectionType.TCP, new IPEndPoint(IPAddress.Parse(txtIP.Text), int.Parse(txtPort.Text)));
//服務器開始監(jiān)聽客戶端的請求
//IPEndPoint thePoint = new IPEndPoint(IPAddress.Parse(txtIP.Text), int.Parse(txtPort.Text));
//TCPConnection.StartListening(thePoint, false);
button1.Text = "監(jiān)聽中";
button1.Enabled = false;
//button1.Text = "監(jiān)聽中";
//button1.Enabled = false;
//此方法中包含服務器具體的處理方法。
StartListening();
}
private void StartListening()
{
//開啟日志記錄
//配置日志記錄器
//ILogger logger = new LiteLogger(LiteLogger.LogMode.ConsoleAndLogFile, "ServerLogFile_" + NetworkComms.NetworkIdentifier + ".txt");
//NetworkComms.EnableLogging(logger);
//禁用日志記錄 服務器端正式使用時,贏禁用日志記錄
NetworkComms.DisableLogging();
//服務器端處理收到的消息
//為簡單起見,此示例中我們只處理字符類型的信息,也返回字符類型的信息。
//處理的信息可以使自定義類,具體見下一個Demo
NetworkComms.AppendGlobalIncomingPacketHandler<LoginContract>("ReqLogin", IncomingLoginRequest);
}
//處理某個具體的請求
private void IncomingLoginRequest(PacketHeader header, Connection connection, LoginContract loginContract)
{
try
{
string resMsg = "";
//為了簡單,這里不調用數(shù)據庫,而是模擬一下登錄
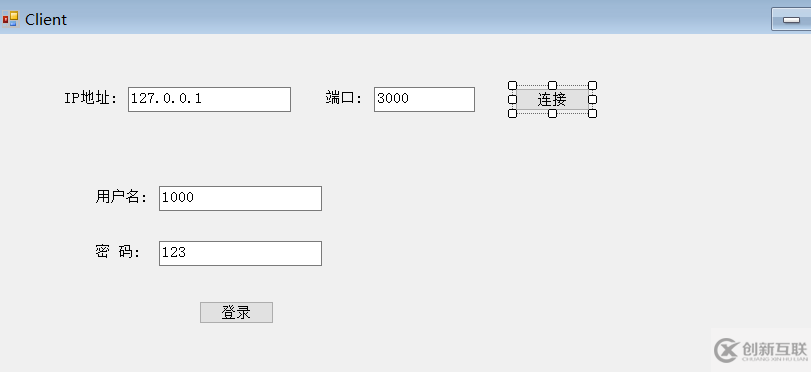
if (loginContract.UserID == "1000" && loginContract.PassWord == "123")
resMsg = "登錄成功";
else
resMsg = "用戶名密碼錯誤";
//把返回結果寫入到契約類中,后面返回給客戶端
//ResMsgContract contract = new ResMsgContract();
//contract.Message = resMsg;
//connection.SendObject<ResMsgContract>("ResLogin", contract);
ResMsgContract contract = new ResMsgContract();
contract.Message = resMsg;
connection.SendObject("ResLogin", contract);
}
catch (Exception ex)
{
// LogTools.LogException(ex, "IncomingMsgHandle");
}
}
}
}在別的幫助中往往少了這行:導致出現(xiàn)客戶端發(fā)送時,類型打包出現(xiàn)問題. 這行代碼是客戶端服務器兩端都要加上的,是指定傳輸方式
SendReceiveOptions aboveOptions = new SendReceiveOptions(DPSManager.GetDataSerializer<ProtobufSerializer>(), null, null);
就是這個報錯了

一下是客戶端
using MessageContract;
using NetworkCommsDotNet;
using NetworkCommsDotNet.Connections;
using NetworkCommsDotNet.Connections.TCP;
using NetworkCommsDotNet.DPSBase;
using System;
using System.Collections.Generic;
using System.ComponentModel;
using System.Data;
using System.Drawing;
using System.Linq;
using System.Text;
using System.Windows.Forms;
namespace AppClient
{
  public partial class MainForm : Form
  {
    public MainForm()
    {
      InitializeComponent();
    }
    //連接信息對象
    public ConnectionInfo connInfo = null;
    //連接對象
    Connection newTcpConnection;
    SendReceiveOptions aboveOptions = new SendReceiveOptions(DPSManager.GetDataSerializer<ProtobufSerializer>(), null, null);
    private void button1_Click(object sender, EventArgs e)
    {
      //給連接信息對象賦值
      connInfo = new ConnectionInfo(txtIP.Text, int.Parse(txtPort.Text));
      //如果不成功,會彈出異常信息
      newTcpConnection = TCPConnection.GetConnection(connInfo);
      button1.Enabled = false;
      button1.Text = "連接成功";
    }
    private void btnlogin_Click(object sender, EventArgs e)
    {
      //給契約類賦值
      LoginContract contract = new LoginContract(txtUserName.Text, txtPassword.Text);
      //contract.UserID = txtUserName.Text;
      //contract.PassWord = txtPassword.Text;
      //向服務器發(fā)送登錄信息并獲取登錄結果
       ResMsgContract resMsg = newTcpConnection.SendReceiveObject<LoginContract, ResMsgContract>("ReqLogin", "ResLogin", 5000, contract);
      //向服務器發(fā)送登錄信息并獲取登錄結果
      // ResMsgContract resMsg = newTcpConnection.SendReceiveObject<ResMsgContract>("ReqLogin", "ResLogin", 5000, contract);
      if (resMsg.Message == "登錄成功")
      {
        MessageBox.Show("登錄成功");
      }
      else
      {
        MessageBox.Show("用戶名密碼錯誤");
      }
    }
  }
}
契約類
using System;
using System.Collections.Generic;
using System.Linq;
using System.Text;
namespace MessageContract
{
  [ProtoContract]
  public class LoginContract
  {
    [ProtoMember(1)]
    public string UserID { get; set; }
    [ProtoMember(2)]
    public string PassWord { get; set; }
    public LoginContract() { }
    public LoginContract(string userID, string passWord)
    {
      this.UserID = userID;
      this.PassWord = passWord;
    }
  }
}
using ProtoBuf;
using System;
using System.Collections.Generic;
using System.Linq;
using System.Text;
namespace MessageContract
{
  [ProtoContract]
  public class ResMsgContract
  {
    [ProtoMember(1)]
    public string Message;
    public ResMsgContract() { }
    public ResMsgContract(string message)
    {
      this.Message = message;
    }
  }
}
注意:
使用這個框架要配合谷歌的protobuf 要選好版本.本人沒重復測試最高版本,因為在調試登錄過程中出現(xiàn)別的問題過程中,也順改了protobuf 的版本,至今未測試最高版本是否存在兼容問題.本人成功的使用的是2.0.0.668
protobuf簡介protobuf是google提供的一個開源序列化框架,類似于XML,JSON這樣的數(shù)據表示語言,其最大的特點是基于二進制,因此比傳統(tǒng)的XML表示高效短小
vs nuget添加方式

輸入

版本選擇自己指定一下,加大項目的契約類里邊.這是自己定義傳輸對象的方式.
結果:

以上就是C# 中怎么利用networkcomms 3.0實現(xiàn)模擬登陸,小編相信有部分知識點可能是我們日常工作會見到或用到的。希望你能通過這篇文章學到更多知識。更多詳情敬請關注創(chuàng)新互聯(lián)行業(yè)資訊頻道。
網站名稱:C#中怎么利用networkcomms3.0實現(xiàn)模擬登陸
鏈接地址:http://www.chinadenli.net/article10/gidpgo.html
成都網站建設公司_創(chuàng)新互聯(lián),為您提供營銷型網站建設、網站營銷、電子商務、小程序開發(fā)、微信公眾號、云服務器
聲明:本網站發(fā)布的內容(圖片、視頻和文字)以用戶投稿、用戶轉載內容為主,如果涉及侵權請盡快告知,我們將會在第一時間刪除。文章觀點不代表本網站立場,如需處理請聯(lián)系客服。電話:028-86922220;郵箱:631063699@qq.com。內容未經允許不得轉載,或轉載時需注明來源: 創(chuàng)新互聯(lián)
- 定制開發(fā)網站建設有什么好處 2021-09-11
- 網站定制開發(fā)公司解讀定制網站特點 2016-10-13
- 廈門APP定制開發(fā)需求分析的注意事項 2023-02-20
- APP定制開發(fā)的優(yōu)勢在哪里? 2022-11-15
- 如何在模板建站和定制開發(fā)中做出選擇呢? 2022-05-02
- 定制開發(fā)網站具有哪些特點? 2022-08-26
- 網站定制開發(fā)對企業(yè)來說好處都體現(xiàn)在哪些方面 2016-10-28
- 微信小程序定制開發(fā) 2022-05-01
- 網站建設定制開發(fā)的好處 2021-05-19
- 網頁制作APP和APP定制開發(fā)有哪些區(qū)別? 2016-08-15
- 微信小程序 定制開發(fā)還是用模板好 2021-02-24
- app定制開發(fā)流程 2023-02-07