ReactNativereact-navigation導(dǎo)航怎么用
這篇文章將為大家詳細(xì)講解有關(guān)React Native react-navigation導(dǎo)航怎么用,小編覺得挺實(shí)用的,因此分享給大家做個(gè)參考,希望大家閱讀完這篇文章后可以有所收獲。
10年積累的成都網(wǎng)站制作、成都網(wǎng)站建設(shè)、外貿(mào)營銷網(wǎng)站建設(shè)經(jīng)驗(yàn),可以快速應(yīng)對(duì)客戶對(duì)網(wǎng)站的新想法和需求。提供各種問題對(duì)應(yīng)的解決方案。讓選擇我們的客戶得到更好、更有力的網(wǎng)絡(luò)服務(wù)。我雖然不認(rèn)識(shí)你,你也不認(rèn)識(shí)我。但先網(wǎng)站設(shè)計(jì)后付款的網(wǎng)站建設(shè)流程,更有武山免費(fèi)網(wǎng)站建設(shè)讓你可以放心的選擇與我們合作。
一、開源庫介紹
Fb推薦使用庫,并且在React Native當(dāng)前最新版本0.44中將Navigator刪除。react-navigation據(jù)稱有原生般的性能體驗(yàn)效果。可能會(huì)成為未來React Native導(dǎo)航組件的主流軍。本篇內(nèi)容基于【 ^1.0.0-beta.9 】版本來介紹關(guān)于該庫的使用和實(shí)戰(zhàn)技巧。可以看到,雖然是beta版本,不過基本穩(wěn)定,大家可放心在項(xiàng)目中使用。奉上 react-navigation 官方文檔
該庫包含三類組件:
(1)StackNavigator:用來跳轉(zhuǎn)頁面和傳遞參數(shù)
(2)TabNavigator:類似底部導(dǎo)航欄,用來在同一屏幕下切換不同界面
(3)DrawerNavigator:側(cè)滑菜單導(dǎo)航欄,用于輕松設(shè)置帶抽屜導(dǎo)航的屏幕
二、react-navigation使用
具體內(nèi)容大致分為如下:
(1)react-navigation庫屬性介紹
(2)StackNavigator、TabNavigator實(shí)現(xiàn)界面間跳轉(zhuǎn),Tab切換
(3)StackNavigator界面間跳轉(zhuǎn)、傳值、取值
(4)DrawerNavigator實(shí)現(xiàn)抽屜導(dǎo)航菜單
(5)DrawerNavigator擴(kuò)展功能
(6)自定義react-navigation
1、StackNavigator屬性介紹
navigationOptions:配置StackNavigator的一些屬性。
title:標(biāo)題,如果設(shè)置了這個(gè)導(dǎo)航欄和標(biāo)簽欄的title就會(huì)變成一樣的,不推薦使用
header:可以設(shè)置一些導(dǎo)航的屬性,如果隱藏頂部導(dǎo)航欄只要將這個(gè)屬性設(shè)置為null
headerTitle:設(shè)置導(dǎo)航欄標(biāo)題,推薦
headerBackTitle:設(shè)置跳轉(zhuǎn)頁面左側(cè)返回箭頭后面的文字,默認(rèn)是上一個(gè)頁面的標(biāo)題。可以自定義,也可以設(shè)置為null
headerTruncatedBackTitle:設(shè)置當(dāng)上個(gè)頁面標(biāo)題不符合返回箭頭后的文字時(shí),默認(rèn)改成"返回"
headerRight:設(shè)置導(dǎo)航條右側(cè)。可以是按鈕或者其他視圖控件
headerLeft:設(shè)置導(dǎo)航條左側(cè)。可以是按鈕或者其他視圖控件
headerStyle:設(shè)置導(dǎo)航條的樣式。背景色,寬高等
headerTitleStyle:設(shè)置導(dǎo)航欄文字樣式
headerBackTitleStyle:設(shè)置導(dǎo)航欄‘返回'文字樣式
headerTintColor:設(shè)置導(dǎo)航欄顏色
headerPressColorAndroid:安卓獨(dú)有的設(shè)置顏色紋理,需要安卓版本大于5.0
gesturesEnabled:是否支持滑動(dòng)返回手勢(shì),iOS默認(rèn)支持,安卓默認(rèn)關(guān)閉
screen:對(duì)應(yīng)界面名稱,需要填入import之后的頁面
mode:定義跳轉(zhuǎn)風(fēng)格
card:使用iOS和安卓默認(rèn)的風(fēng)格
modal:iOS獨(dú)有的使屏幕從底部畫出。類似iOS的present效果
headerMode:返回上級(jí)頁面時(shí)動(dòng)畫效果
float:iOS默認(rèn)的效果
screen:滑動(dòng)過程中,整個(gè)頁面都會(huì)返回
none:無動(dòng)畫
cardStyle:自定義設(shè)置跳轉(zhuǎn)效果
transitionConfig: 自定義設(shè)置滑動(dòng)返回的配置
onTransitionStart:當(dāng)轉(zhuǎn)換動(dòng)畫即將開始時(shí)被調(diào)用的功能
onTransitionEnd:當(dāng)轉(zhuǎn)換動(dòng)畫完成,將被調(diào)用的功能
path:路由中設(shè)置的路徑的覆蓋映射配置
initialRouteName:設(shè)置默認(rèn)的頁面組件,必須是上面已注冊(cè)的頁面組件
initialRouteParams:初始路由參數(shù)
注:大家可能對(duì)于path不太理解。path屬性適用于其他app或?yàn)g覽器使用url打開本app并進(jìn)入指定頁面。path屬性用于聲明一個(gè)界面路徑,例如:【/pages/Home】。此時(shí)我們可以在手機(jī)瀏覽器中輸入:app名稱://pages/Home來啟動(dòng)該App,并進(jìn)入Home界面。
2、TabNavigator屬性介紹
screen:和導(dǎo)航的功能是一樣的,對(duì)應(yīng)界面名稱,可以在其他頁面通過這個(gè)screen傳值和跳轉(zhuǎn)。
navigationOptions:配置TabNavigator的一些屬性
title:標(biāo)題,會(huì)同時(shí)設(shè)置導(dǎo)航條和標(biāo)簽欄的title
tabBarVisible:是否隱藏標(biāo)簽欄。默認(rèn)不隱藏(true)
tabBarIcon:設(shè)置標(biāo)簽欄的圖標(biāo)。需要給每個(gè)都設(shè)置
tabBarLabel:設(shè)置標(biāo)簽欄的title。推薦
導(dǎo)航欄配置
tabBarPosition:設(shè)置tabbar的位置,iOS默認(rèn)在底部,安卓默認(rèn)在頂部。(屬性值:'top','bottom')
swipeEnabled:是否允許在標(biāo)簽之間進(jìn)行滑動(dòng)
animationEnabled:是否在更改標(biāo)簽時(shí)顯示動(dòng)畫
lazy:是否根據(jù)需要懶惰呈現(xiàn)標(biāo)簽,而不是提前,意思是在app打開的時(shí)候?qū)⒌撞繕?biāo)簽欄全部加載,默認(rèn)false,推薦為true
trueinitialRouteName: 設(shè)置默認(rèn)的頁面組件
backBehavior:按 back 鍵是否跳轉(zhuǎn)到第一個(gè)Tab(首頁), none 為不跳轉(zhuǎn)
tabBarOptions:配置標(biāo)簽欄的一些屬性iOS屬性
activeTintColor:label和icon的前景色 活躍狀態(tài)下
activeBackgroundColor:label和icon的背景色 活躍狀態(tài)下
inactiveTintColor:label和icon的前景色 不活躍狀態(tài)下
inactiveBackgroundColor:label和icon的背景色 不活躍狀態(tài)下
showLabel:是否顯示label,默認(rèn)開啟 style:tabbar的樣式
labelStyle:label的樣式安卓屬性
activeTintColor:label和icon的前景色 活躍狀態(tài)下
inactiveTintColor:label和icon的前景色 不活躍狀態(tài)下
showIcon:是否顯示圖標(biāo),默認(rèn)關(guān)閉
showLabel:是否顯示label,默認(rèn)開啟 style:tabbar的樣式
labelStyle:label的樣式 upperCaseLabel:是否使標(biāo)簽大寫,默認(rèn)為true
pressColor:material漣漪效果的顏色(安卓版本需要大于5.0)
pressOpacity:按壓標(biāo)簽的透明度變化(安卓版本需要小于5.0)
scrollEnabled:是否啟用可滾動(dòng)選項(xiàng)卡 tabStyle:tab的樣式
indicatorStyle:標(biāo)簽指示器的樣式對(duì)象(選項(xiàng)卡底部的行)。安卓底部會(huì)多出一條線,可以將height設(shè)置為0來暫時(shí)解決這個(gè)問題
labelStyle:label的樣式
iconStyle:圖標(biāo)樣式
3、DrawerNavigator屬性介紹
DrawerNavigatorConfig
drawerWidth - 抽屜的寬度
drawerPosition - 選項(xiàng)是左或右。 默認(rèn)為左側(cè)位置
contentComponent - 用于呈現(xiàn)抽屜內(nèi)容的組件,例如導(dǎo)航項(xiàng)。 接收抽屜的導(dǎo)航。 默認(rèn)為DrawerItems
contentOptions - 配置抽屜內(nèi)容
initialRouteName - 初始路由的routeName
order - 定義抽屜項(xiàng)目順序的routeNames數(shù)組。
路徑 - 提供routeName到路徑配置的映射,它覆蓋routeConfigs中設(shè)置的路徑。
backBehavior - 后退按鈕是否會(huì)切換到初始路由? 如果是,設(shè)置為initialRoute,否則為none。 默認(rèn)為initialRoute行為
DrawerItems的contentOptions屬性
activeTintColor - 活動(dòng)標(biāo)簽的標(biāo)簽和圖標(biāo)顏色
activeBackgroundColor - 活動(dòng)標(biāo)簽的背景顏色
inactiveTintColor - 非活動(dòng)標(biāo)簽的標(biāo)簽和圖標(biāo)顏色
inactiveBackgroundColor - 非活動(dòng)標(biāo)簽的背景顏色
內(nèi)容部分的樣式樣式對(duì)象
labelStyle - 當(dāng)您的標(biāo)簽是字符串時(shí),要覆蓋內(nèi)容部分中的文本樣式的樣式對(duì)象
從上述中大致了解了react-navigation三種組件的一些基本屬性,所以到我們甩起袖子擼代碼見證下奇跡了。
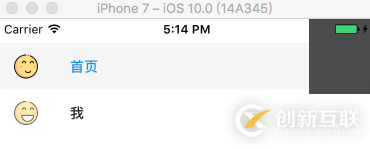
4、使用StackNavigator + TabNavigator實(shí)現(xiàn)Tab界面切換、界面間導(dǎo)航
API定義:StackNavigator(RouteConfigs, StackNavigatorConfig)、TabNavigator(RouteConfigs, TabNavigatorConfig)
(1)集成 react-navigation:在終端執(zhí)行 【 npm install react-navigation --save 】
(2)界面中導(dǎo)入必要組件:
import {StackNavigator,TabNavigator,TabBarBottom} from 'react-navigation';
import HomeScreen from './pages/HomePage';
import MineScreen from './pages/MinePage';
(3)定義TabNavigator:
const Tab = TabNavigator(
 {
  Home:{
   screen:HomeScreen,
   navigationOptions:({navigation}) => ({
    tabBarLabel:'首頁',
    tabBarIcon:({focused,tintColor}) => (
     <TabBarItem
      tintColor={tintColor}
      focused={focused}
      normalImage={require('./imgs/nav_fav@2x.png')}
      selectedImage={require('./imgs/nav_fav_actived@3x.png')}
     />
    )
   }),
  },

  Mine:{
     screen:MineScreen,
     navigationOptions:({navigation}) => ({
     tabBarLabel:'我',
     tabBarIcon:({focused,tintColor}) => (
      <TabBarItem
       tintColor={tintColor}
       focused={focused}
       normalImage={require('./imgs/tab_me_nor@3x.png')}
       selectedImage={require('./imgs/tab_me_selected@2x.png')}
      />
     )
    }),
   },
  },

  {
   tabBarComponent:TabBarBottom,
   tabBarPosition:'bottom',
   swipeEnabled:false,
   animationEnabled:false,
   lazy:true,
   tabBarOptions:{
    activeTintColor:'#06c1ae',
    inactiveTintColor:'#979797',
    style:{backgroundColor:'#ffffff',},
    labelStyle: {
       fontSize: 20, // 文字大小
     },
   }

  }

 );
TabBarItem為封裝的組件:
import React,{Component} from 'react';
import {Image} from 'react-native';

export default class TabBarItem extends Component {

  render() {
    return(
      <Image source={ this.props.focused ? this.props.selectedImage : this.props.normalImage }
        style={ { tintColor:this.props.tintColor,width:25,height:25 } }
      />
    )
  }

}
可以看到,我們定義了一個(gè)名稱為【Tab】的TabNavigator的導(dǎo)航組件。在組件中,分為兩層參數(shù):
(1)第一層參數(shù)定義了要切換的界面,即【首頁】、【我】兩個(gè)界面組件,通過screen屬性指定。并且通過navigationOptions屬性設(shè)置相關(guān)屬性參數(shù)。
(2)設(shè)置導(dǎo)航欄的屬性參數(shù)。
TabNavigator定義好之后,需要用StackNavigator,顧名思義,StackNavigator就是以棧的方式來存放整個(gè)界面的,而
TabNavigator是作為一個(gè)界面內(nèi)不同子界面之間切換。所以還需要我們定義StackNavigator:
const Navigator = StackNavigator(

 {
  Tab:{screen:Tab},
  Product:{screen:ProductScreen}
 },

 {
  navigationOptions:{
   headerBackTitle:null,
   headerTintColor:'#333333',
   showIcon:true,
   swipeEnabled:false,
   animationEnabled:false,
  },

  mode:'card',
 });
看起來和TabNavigator很相似,同樣是指定了兩個(gè)參數(shù):
(1)指定要跳轉(zhuǎn)的界面組件。同樣是screen屬性標(biāo)識(shí)界面組件,不多贅述。
(2)定義跳轉(zhuǎn)屬性參數(shù),即頂部導(dǎo)航欄的一些參數(shù)設(shè)置和跳轉(zhuǎn)方式。
可以看到,我們將Tab作為一個(gè)界面設(shè)置到了StackNavigator。這樣就可以實(shí)現(xiàn)Tab導(dǎo)航和界面間跳轉(zhuǎn)的效果了。
最后就是在render中引用StackNavigator:
export default class Demo extends Component {

 render() {
    return (
     <Navigator />
    );
 }
}
StackNavigator還提供了onNavigationStateChange回調(diào)方法,用來監(jiān)聽導(dǎo)航狀態(tài)的改變。具體不再贅述。實(shí)現(xiàn)了界面跳轉(zhuǎn)和切換,那么就該來增加下界面之間的感情了,來看看如何實(shí)現(xiàn)界面之間的傳值和取值。
5、界面間跳轉(zhuǎn)、傳值、取值
在界面組件注入到StackNavigator中時(shí),界面組件就被賦予了navigation屬性,即在界面組件中可以通過【this.props.navigation】獲取并進(jìn)行一些操作。
navigation屬性中提供了很多的函數(shù)簡化界面間操作,簡單列舉幾點(diǎn):
(1)通過navigate函數(shù)實(shí)現(xiàn)界面之間跳轉(zhuǎn):
this.props.navigation.navigate('Mine');參數(shù)為我們?cè)赟tackNavigator注冊(cè)界面組件時(shí)的名稱。同樣也可以從當(dāng)前頁面返回到上一頁:
// 返回上一頁
this.props.navigation.goBack();
(2)跳轉(zhuǎn)時(shí)傳值:
this.props.navigation.navigate('Mine',{info:'傳值過去'});第一個(gè)參數(shù)同樣為要跳轉(zhuǎn)的界面組件名稱,第二個(gè)參數(shù)為要傳遞的參數(shù),info可以理解為key,后面即傳遞的參數(shù)。
(3)獲取值:
{this.props.navigation.state.params.info}通過state.params來獲取傳來的參數(shù),后面為key值。此處為info。
以上實(shí)現(xiàn)完成,我們就可以愉快的玩耍啦~~ 什么?忽然發(fā)現(xiàn)在Android上的效果和IOS效果不一樣。老板要界面一致哇~ 怎么辦?那就需要我們進(jìn)行簡單的適配了。
三、DrawerNavigator實(shí)現(xiàn)抽屜導(dǎo)航
1、導(dǎo)航實(shí)現(xiàn)
API定義:DrawerNavigator(RouteConfigs,DrawerNavigatorConfig)
(1)界面中定義DrawerNavigator:
import {StackNavigator,TabNavigator,DrawerNavigator} from 'react-navigation';
import HomeScreen from './pages/HomePage';
import MineScreen from './pages/MinePage';

export default class Demo extends Component {

 render() {
    return (
     <Navigator />
    );
 }
}

const Navigator = DrawerNavigator({

  Home:{screen:HomeScreen},
  Mine:{screen:MineScreen},
});

const styles = StyleSheet.create({

  container: {
    flex: 1,
  },
});

AppRegistry.registerComponent('Demo', () => Demo);
定義方式和StackNavigator基本類似,不再贅述。
(2)HomeScreen界面和MineScreen界面:
export default class HomePage extends Component {

  static navigationOptions = {
    drawerLabel: '首頁',
    drawerIcon:({tintColor}) => (
      <Image
        source={require('./../imgs/ic_happy.png')}
        style={[styles.icon, {tintColor: tintColor}]}/>
    ),
  };

  render() {
    return(
      <View style={{flex:1}}>
        <Text onPress={this._skip.bind(this)}>點(diǎn)擊跳轉(zhuǎn)</Text>
      </View>
    );
  }

  _skip() {
    this.props.navigation.navigate("Mine");
  }
}


export default class MinePage extends Component {

  static navigationOptions = {
    drawerLabel:'我',
     drawerIcon: ({ tintColor }) => (
      <Image
        source={require('./../imgs/ic_h.png')}
        style={[styles.icon, {tintColor: tintColor}]}
      />
    ),
  };

  render() {
    return(
      <View style={{flex:1}}>
        <Text onPress={this._skip.bind(this)}>返回上一界面</Text>
      </View>
    );
  }

  /**
   * 跳轉(zhuǎn)
   */
  _skip() {
    this.props.navigation.goBack();
  }
}
代碼很簡單,實(shí)現(xiàn)了界面之間的跳轉(zhuǎn)。
2、擴(kuò)展功能
(1)默認(rèn)DrawerView不可滾動(dòng)。要實(shí)現(xiàn)可滾動(dòng)視圖,必須使用contentComponent自定義容器,如下所示:
{
 drawerWidth:200,
 抽屜位置:“對(duì)”
 contentComponent:props => <ScrollView> <DrawerItems {... props} /> </ ScrollView>
}
(2)可以覆蓋導(dǎo)航使用的默認(rèn)組件,使用DrawerItems自定義導(dǎo)航組件:
import {DrawerItems} from 'react-navigation';

const CustomDrawerContentComponent = (props) => (
 <View style = {style.container}>
  <DrawerItems {... props} />
 </View>
);
(3)嵌套抽屜導(dǎo)航
如果您嵌套DrawerNavigation,抽屜將顯示在父導(dǎo)航下方。
四、自定義react-navigation
(1)適配頂部導(dǎo)航欄標(biāo)題:
測(cè)試中發(fā)現(xiàn),在iphone上標(biāo)題欄的標(biāo)題為居中狀態(tài),而在Android上則是居左對(duì)齊。所以需要我們修改源碼,進(jìn)行適配。
【node_modules -- react-navigation -- src -- views -- Header.js】的326行代碼處,修改為如下:
title: {
  bottom: 0,
  left: TITLE_OFFSET,
  right: TITLE_OFFSET,
  top: 0,
  position: 'absolute',
  alignItems: 'center',
 }
上面方法通過修改源碼的方式其實(shí)略有弊端,畢竟擴(kuò)展性不好。還有另外一種方式就是,在navigationOptions中設(shè)置headerTitleStyle的alignSelf為 ' center '即可解決。
(2)去除返回鍵文字顯示:
【node_modules -- react-navigation -- src -- views -- HeaderBackButton.js】的91行代碼處,修改為如下即可。
{Platform.OS === 'ios' &&
   title &&
   <Text
    onLayout={this._onTextLayout}
    style={[styles.title, { color: tintColor }]}
    numberOfLines={1}
   >
    {backButtonTitle}
   </Text>}
將上述代碼刪除即可。
(3)動(dòng)態(tài)設(shè)置頭部按鈕事件:
當(dāng)我們?cè)陬^部設(shè)置左右按鈕時(shí),肯定避免不了要設(shè)置按鈕的單擊事件,但是此時(shí)會(huì)有一個(gè)問題,navigationOptions是被修飾為static類型的,所以我們?cè)诎粹o的onPress的方法中不能直接通過this來調(diào)用Component中的方法。如何解決呢?在官方文檔中,作者給出利用設(shè)置params的思想來動(dòng)態(tài)設(shè)置頭部標(biāo)題。那么我們可以利用這種方式,將單擊回調(diào)函數(shù)以參數(shù)的方式傳遞到params,然后在navigationOption中利用navigation來取出設(shè)置到onPress即可:
componentDidMount () {
  /**
   * 將單擊回調(diào)函數(shù)作為參數(shù)傳遞
   */
  this.props.navigation.setParams({
      switch: () => this.switchView()
  });
}
/**
* 切換視圖
*/
switchView() {
alert('切換')
}static navigationOptions = ({navigation,screenProps}) => ({
headerTitle: '企業(yè)服務(wù)',
headerTitleStyle: CommonStyles.headerTitleStyle,
headerRight: (
<NavigatorItem icon={ Images.ic_navigator } onPress={ ()=> navigation.state.params.switch() }/>
),
headerStyle: CommonStyles.headerStyle
});(4)結(jié)合BackHandler處理返回和點(diǎn)擊返回鍵兩次退出App效果
點(diǎn)擊返回鍵兩次退出App效果的需求屢見不鮮。相信很多人在react-navigation下實(shí)現(xiàn)該功能都遇到了很多問題,例如,其他界面不能返回。也就是手機(jī)本身返回事件在react-navigation之前攔截了。如何結(jié)合react-natigation實(shí)現(xiàn)呢?和大家分享兩種實(shí)現(xiàn)方式:
(1)在注冊(cè)StackNavigator的界面中,注冊(cè)BackHandler:
componentWillMount(){
  BackHandler.addEventListener('hardwareBackPress', this._onBackAndroid );
}


componentUnWillMount(){
  BackHandler.addEventListener('hardwareBackPress', this._onBackAndroid);
}

_onBackAndroid=()=>{
  let now = new Date().getTime();
  if(now - lastBackPressed < 2500) {
    return false;
  }
  lastBackPressed = now;
  ToastAndroid.show('再點(diǎn)擊一次退出應(yīng)用',ToastAndroid.SHORT);
  return true;
}
(2)監(jiān)聽react-navigation的Router
/**
 * 處理安卓返回鍵
 */
const defaultStateAction = AppNavigator.router.getStateForAction;
AppNavigator.router.getStateForAction = (action,state) => {
  if(state && action.type === NavigationActions.BACK && state.routes.length === 1) {
    if (lastBackPressed + 2000 < Date.now()) {
      ToastAndroid.show(Constant.hint_exit,ToastAndroid.SHORT);
      lastBackPressed = Date.now();
      const routes = [...state.routes];
      return {
        ...state,
        ...state.routes,
        index: routes.length - 1,
      };
    }
  }
  return defaultStateAction(action,state);
};
(5)實(shí)現(xiàn)Android中界面跳轉(zhuǎn)左右切換動(dòng)畫
react-navigation在Android中默認(rèn)的界面切換動(dòng)畫是上下。如何實(shí)現(xiàn)左右切換呢?很簡單的配置即可:
復(fù)制代碼 代碼如下:
import CardStackStyleInterpolator from 'react-navigation/src/views/CardStackStyleInterpolator';
然后在StackNavigator的配置下添加如下代碼:
transitionConfig:()=>({
  screenInterpolator: CardStackStyleInterpolator.forHorizontal,
})
(6)解決快速點(diǎn)擊多次跳轉(zhuǎn)
當(dāng)我們快速點(diǎn)擊跳轉(zhuǎn)時(shí),會(huì)開啟多個(gè)重復(fù)的界面,如何解決呢。其實(shí)在官方git中也有提示,解決這個(gè)問題需要修改react-navigation源碼:
找到scr文件夾中的addNavigationHelpers.js文件,替換為如下文本即可:
export default function<S: *>(navigation: NavigationProp<S, NavigationAction>) {
 // 添加點(diǎn)擊判斷
 let debounce = true;
 return {
   ...navigation,
   goBack: (key?: ?string): boolean =>
     navigation.dispatch(
       NavigationActions.back({
         key: key === undefined ? navigation.state.key : key,
       }),
     ),
   navigate: (routeName: string,
         params?: NavigationParams,
         action?: NavigationAction,): boolean => {
     if (debounce) {
       debounce = false;
       navigation.dispatch(
         NavigationActions.navigate({
           routeName,
           params,
           action,
         }),
       );
       setTimeout(
         () => {
           debounce = true;
         },
       500,
       );
       return true;
     }
     return false;
   },
  /**
   * For updating current route params. For example the nav bar title and
   * buttons are based on the route params.
   * This means `setParams` can be used to update nav bar for example.
   */
  setParams: (params: NavigationParams): boolean =>
   navigation.dispatch(
    NavigationActions.setParams({
     params,
     key: navigation.state.key,
    }),
   ),
 };
}
五、效果圖
抽屜導(dǎo)航:
關(guān)于“React Native react-navigation導(dǎo)航怎么用”這篇文章就分享到這里了,希望以上內(nèi)容可以對(duì)大家有一定的幫助,使各位可以學(xué)到更多知識(shí),如果覺得文章不錯(cuò),請(qǐng)把它分享出去讓更多的人看到。
本文標(biāo)題:ReactNativereact-navigation導(dǎo)航怎么用
分享地址:http://www.chinadenli.net/article0/ishsio.html
成都網(wǎng)站建設(shè)公司_創(chuàng)新互聯(lián),為您提供關(guān)鍵詞優(yōu)化、域名注冊(cè)、小程序開發(fā)、網(wǎng)頁設(shè)計(jì)公司、品牌網(wǎng)站制作、手機(jī)網(wǎng)站建設(shè)
聲明:本網(wǎng)站發(fā)布的內(nèi)容(圖片、視頻和文字)以用戶投稿、用戶轉(zhuǎn)載內(nèi)容為主,如果涉及侵權(quán)請(qǐng)盡快告知,我們將會(huì)在第一時(shí)間刪除。文章觀點(diǎn)不代表本網(wǎng)站立場,如需處理請(qǐng)聯(lián)系客服。電話:028-86922220;郵箱:631063699@qq.com。內(nèi)容未經(jīng)允許不得轉(zhuǎn)載,或轉(zhuǎn)載時(shí)需注明來源: 創(chuàng)新互聯(lián)

- 什么樣的網(wǎng)頁設(shè)計(jì)公司最專業(yè) 2021-10-31
- H5網(wǎng)頁設(shè)計(jì)公司為您分析移動(dòng)端H5網(wǎng)頁設(shè)計(jì)尺寸 2022-09-19
- 成都網(wǎng)頁設(shè)計(jì)公司怎么去打造響應(yīng)型網(wǎng)站? 2016-10-21
- 在選擇網(wǎng)頁設(shè)計(jì)公司之前要問的10個(gè)問題 2022-08-06
- 網(wǎng)頁設(shè)計(jì)公司為教育定制網(wǎng)站的作用 2016-10-22
- 深圳網(wǎng)站網(wǎng)頁設(shè)計(jì)公司該怎么選擇呢? 2022-05-09
- 成都教育培訓(xùn)型營銷網(wǎng)頁設(shè)計(jì)公司哪家好? 2016-10-26
- 企業(yè)應(yīng)該怎樣選擇網(wǎng)頁設(shè)計(jì)公司? 2023-05-02
- 盤點(diǎn)排名靠前的網(wǎng)頁設(shè)計(jì)公司 2022-07-25
- 深圳最好的網(wǎng)頁設(shè)計(jì)公司科技 2021-08-18
- 創(chuàng)新互聯(lián):網(wǎng)頁設(shè)計(jì)公司對(duì)網(wǎng)站建站影響 2022-12-01
- 靜安網(wǎng)頁設(shè)計(jì)公司:網(wǎng)站文章中有多少鏈接才算合理? 2020-11-16